Abstract: Unlike C5, Airwheel C6 Bluetooth helmet is more appropriate for Extreme sports and bike geers, like riding motorcycles. Many swoon over it, however, do you use it in a right way?

The appearance of Airwheel C6 has further enriched C series of smart helmet. If you have purchased one, please check the following matters before wearing the C6, like the appearance, components and functional modules. The following matters you should pay attention to when use Airwheel C6 motorcycle helmet.
1. Do not clean C6 with detergent, as it may cause damage to the EPS;
2. Changing or removing any of the original accessories are forbidden;
3. Do not wear C6 once it has experienced a big impact and has a crack;
4. Do not wear C6 in engineering work, as it cannot replace the Safety Helmet.
How to use Airwheel C6 open face helmet is answered in the following.
(more details click C6 user manual)
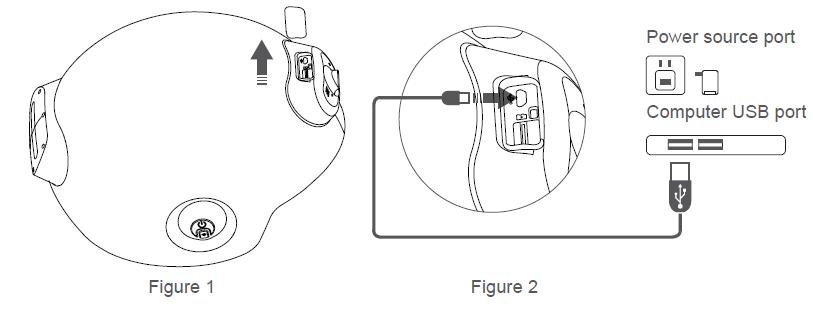
Open the USB stopple in the front of helmet (as Figure 1 shows), connect the Micro 5PIN USB cable with power source (power adapter or computer USB port) to charge. For first usage, see Figure 2.

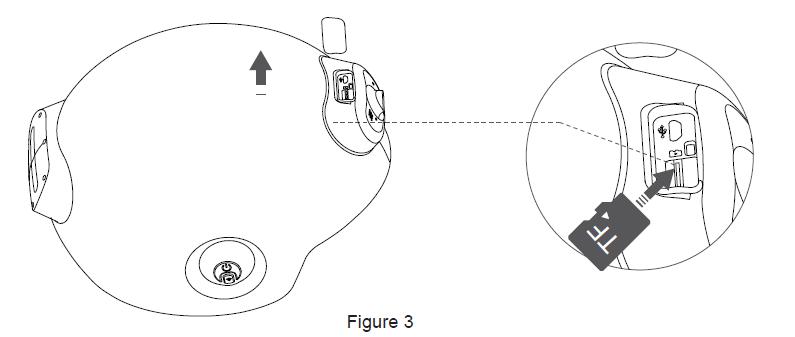
As Figure 3 shows, pull open the USB stopple, insert the TF card in the arrow direction until it does not pop out, and then push the TF card to take out. (Note: the TF card with the speed of 80mb/s and 10+ Video Class is recommended.

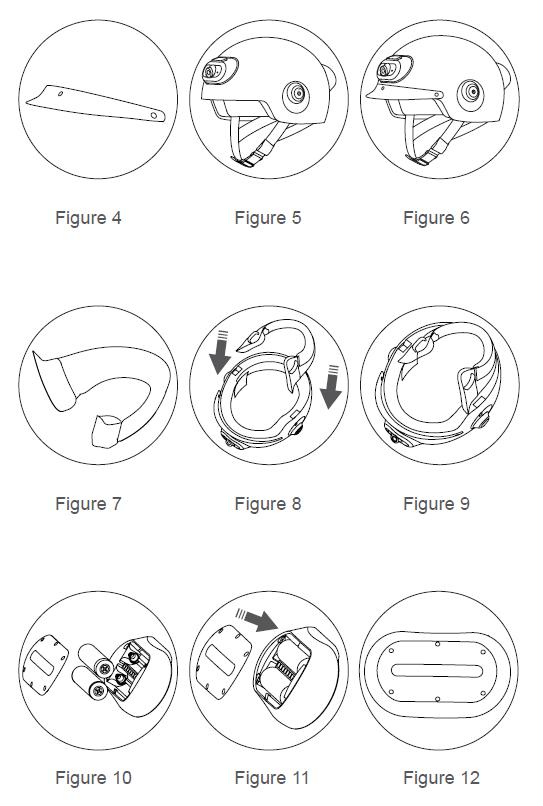
Also, there are some other functions of Airwheel C6 smart helmet that need to describe. The first one is the cap peak (Optional). Installation of cap peak: (Figure 4) take out the cap peak, align the cap peak's press button with the helmet head (Figure 5), and press the button to complete the installation (Figure 6). Secondly, it is the neckerchief (Optional). Installation of neckerchief: (Figure 7) take out the neckerchief, align the neckerchief zipper with the helmet lining zipper (Figure 8), pull the zipper to complete the installation (Figure 9). Lastly, it is about the battery. Replace the battery: (Figure 10) Unscrew the screws and the battery cover screw in counterclockwise, put the battery into the battery box (Figure 11), and tighten the screws in clockwise to complete replacement (Figure 12).
